CentOS+uWSGI+Nginx 配置Django Web服务器
23 Sep 2012Django自带有个web服务器,用于测试,不过正式使用的话,还是自己配个吧。
Apache,我想换个口味,Nginx好多我喜欢的站点都用它(比如:豆瓣,巴士电台),而且性能很不错,很多方面都超越了前者,就它了。
约定程序版本:CentOS: 6.3(Final)
uWSGI:1.2.6
Python:2.6.6
Nginx:1.3.6
Django:1.41
以上版本不同请升级
配置时间:2012.9.23
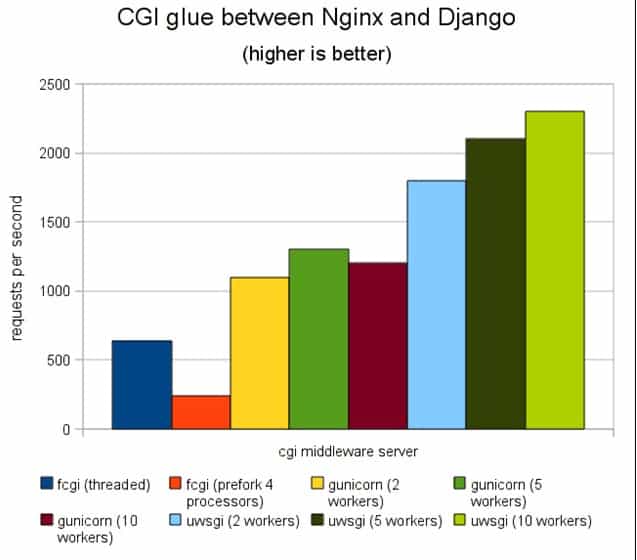
这里有个显示uWSGI如何牛逼的一张图
关于uWSGI:
uWSGI 是一个快速的、纯C语言开发的、自维护的、对开发者友好的WSGI服务器,旨在提供专业的Python web应用发布和开发。它更符合python web的标准协议,速度要比Fastcgi要快、性能更加稳定。
所以我们就不用fastcgi了,直接上uWSGI。
安装:
安装过程可谓一波三折,惊心动魄。
- pcre
yum install pcre
2.uWSGI
wget http://projects.unbit.it/downloads/uwsgi-1.2.6.tar.gz
安装uwsgi需要libxml2
yum install libxml2
接着解压uwsgi
tar -zxvf uwsgi-1.2.6.tar.gz
cd uwsgi-1.2.6
make
这里如果弹出一大堆错误的话(比如没有python的各种.h文件)
那么,安装python-devel
yum insall python-devel
之后再make 应该就没问题了
cp uwsgi /usr/bin
这样uwsgi在哪里都可以运行了
3.Nginx
wget http://download.nginx.org/nginx-1.3.6.tar.gz
Nginx编译需要pcre和openssl的支持,先下载安装:
yum install pcre-devel openssl openssl-devel
编译:
cd nginx-1.3.6
./configure
make
make install
4.启动uswgi服务
让我们来写一个demo测试一下
vim myapp.py
def application(environ, start_response):
start_response(’200 OK’, [(‘Content-Type’, ‘text/plain’)])
yield ‘Hello World\n’
运行uwsgi
uwsgi -s 127.0.0.1:3031 -w myapp
正常情况,会出现提示:
*\* Starting uWSGI 1.2.6(64bit) on [Sun Sep 23 00:56:02 2012] **
compiled with version: 4.4.6 20120305(Red Hat 4.4.6-4) on 22 September 2012 21:38:09detected number of CPU cores:1
current working directory: /z/mysite
uWSGI running as root, you can use –uid/–gid/–chroot options
*\* WARNING: you are running uWSGI as root !!! (use the –uid flag) **
*\* WARNING: you are running uWSGI without its master process manager **
your memory page size is 4096 bytes
uwsgi socket 0 bound to TCP address 127.0.0.1:3031 fd 3
Python version: 2.6.6 (r266:84292, Sep 11 2012 ,08:34:23) [GCC 4.4.6 20120305(Red Hat 4.4.6-4)]
Python main interpreter initialized at 0x883ed30
your server socket listen backlog is limited to 100 connections
*\* Operational MODE: single process **
WSGI application 0 (SCRIPT_NAME=) ready on interpreter 0x883ed30 (default app)
*\* uWSGI is running in multiple interpreter mode **
spawned uWSGI worker 1 (and the only) (pid: 1208, cores: 1)
5.配置并启动Nginx
编辑 /usr/local/nginx/conf/nginx.conf
location / {
uwsgi_pass 127.0.0.1:3031;
include uwsgi_params;
在3031端口监听
保存退出
启动nginx
./nginx
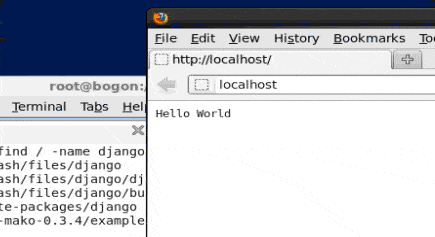
浏览器中输入http://localhost
如果看到那么平台可以运行了。
6.接着部署我们的Django,请参考Django+Mysql部署教程
7.使用Nginx作为服务器(我的项目在/z/mysite)
uwsgi充当了python解析器的角色,使用wsgi的接口和Python程序交互,这个过程中做了优化,和上层nginx之间则设计了更加轻量的协议。
修改nginx.conf,如果安装的时候没有指定它具体安装在别的地方,那么就在/usr/local/nginx/conf/nginx.conf
添加如下:
server {
listen 80;
server_name localhost;
access_log /var/log/nginx/localhost.access.log;
error_log /var/log/nginx/localhost.error.log;location / {
root /z/mysite;
uwsgi_pass 127.0.0.1:3031;
include uwsgi_params;
access_log off;
}location /static {
root /z/mysite;
}location ~.*.(gif|jpg|png|ico|jpeg|bmp|swf)$ {
expires 3d;
}location ~.*.(css|js)$ {
expires 12h;
}…
}
- 在项目文件夹下新建wsgi.py,添加内容如下:
import sys
import os
import django.core.handlers.wsgisys.path.append(‘/z/mysite’)
os.environ[‘DJANGO_SETTINGS_MODULE’]=’mysite.settings’
application = django.core.handlers.wsgi.WSGIHandler()
9.运行uwsgi,运行nginx
在/z/mysite下 :uwsgi –socket 127.0.0.1:3031 –chdir /z/mysite –pp .. -w wsgi
在/usr/local/nginx/sbin下:./nginx
10.现在在浏览器中输入localhost看看效果吧。


